BY GORDON ZAHARA
 Several years ago, I decided to devote my time entirely to nugget hunting in northern California, giving up the other methods I was using. Being retired at a relatively early age, I had plenty of time. And so, I spent approximately six hours a day, four days a week, during the next two years, learning by trial and error what equipment to use, how to use it properly, and where to go to be the most effective with it.
After numerous requests, I have decided that this web site would be an appropriate place to pass along some of the helpful tips I’ve learned–things that will make it easier for someone who wants to get started, or improve their methods in the rewarding activity of detecting for gold nuggets.
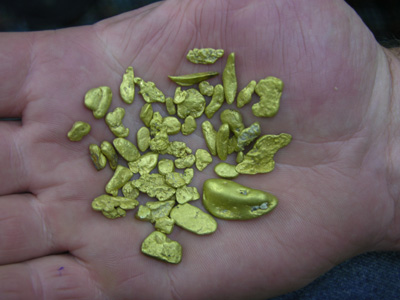
Also, during the past several years, technology in the field of nugget detecting equipment has been improving rapidly. With the advanced technology and capabilities they put into the new designs, a prospecting metal detector (one designed specifically for finding gold nuggets) is capable of finding a piece of gold at greater depths than ever before, and some people can detect pieces weighing as little as 1/10 of a grain with ease.
When deciding on the metal detector of your choice, a few good points to remember are:
 1) Seek out friends or other qualified individuals who can answer questions and show you how to use metal detectors designed for gold nugget hunting. Nugget detecting is a specialized field in itself.
2) Find a reputable equipment dealer who has a good selection of prospecting detectors. Note: All metal detectors have the capability of finding gold nuggets. But a detector designed specifically to find gold will give you a far better edge in your quest, make it easier, and more fun.
3) Have your friend or dealer bench-test various detectors for you. This will allow you to compare the depths and capabilities of the various detectors. (Please keep in mind that the degree of mineralization in the soil you’ll be working is going to affect the detector’s sensitivity and therefore your ability to find the same sized pieces. You won’t be able to find them at the same depth in the soil as you’re able to in the air.) Therefore, it is also of extreme importance to choose a detector that is going to be able to handle the heaviest mineralization possible.
4) Another helpful tip to use when selecting your detector is to know that in recent years we have generally found that the higher the operating frequency or kilohertz (khz) of a detector, the smaller the gold that can be found with that detector.
5) Upon choosing your new detector, make sure your dealer instructs you in the use of your new machine. This can be done in various ways. The best ways are by either using a test-patch (area with gold and other metal targets buried in mineralized soil), or by having the dealer take you to a gold bearing area and give you hands-on training with your new detector. You should never test a detector solely inside a building. Because the results will not be accurate, due to the materials in the walls and floors. In addition, exclusive testing there will result in your finding yourself alone in the field with your new detector and not knowing how to effectively make use of it. Because a detector’s response in the field is completely different from a “bench test.”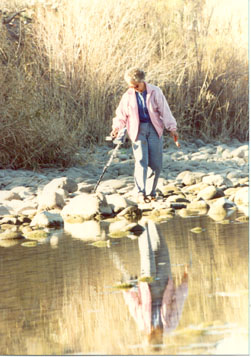
The following is a list of some of the metal detector accessories and tools you will need to be successful, as well as the purposes they serve to facilitate your quest:
1) Earphones: A necessity for nugget hunting. You will lose 80% of your detector’s sensitivity if you try to detect without them. They should be well padded, allowing for long periods of usage. It is also a good idea to have some type of built-in booster which adds to the depth capabilities of your detector and enhances the metallic sound of the gold.
2) Coil Cover: A small item, but quite important. It will protect the bottom and sides of the coil and give it a much longer life.
3) Digging Tools: There are many types to choose from, so find the one, or ones that best suit you.
4) Plastic Cup: To be used to separate a target from the soil by process of elimination. It should be about 4×3 inches, and slightly flexible.
5) Rake: Any type of heavy-duty rake will work. The rake is often used to eliminate soil from a paying area, a few inches at a time. This enables an electronic prospector to find deeper nuggets. Using the raking system, I have found many nuggets that I would have otherwise missed. Note: Gold nuggets are often found in patches. So where one nugget is found, many more may be located.
I feel that the above items are the most important accessories you will need. There are a great number of other products on the market, and you can determine if you need them or not after you have been detecting awhile.
Where to hunt? The best answer I can give to this question is, hunt anywhere that gold nuggets have been found in the past. In other words, any gold bearing area. Almost any research books on past mining operations and other related topics can help you locate prospective metal detecting areas. After you have located an area, you must make sure that it is not private property or already under mining claim.
Many people have trouble finding areas to metal detect for nuggets. If this is your problem, you might consider joining a mining organization.
Here are a few pointers that may help you after you have found the areas you want to metal detect.
For Desert Areas, check the following:
1) Exposed Bedrock: Gold can usually be found on bedrock, or in exposed crevices.
2) Washes: Desert gold is moved by flash floods, which create washes that may be gold bearing. The banks of washes also sometimes pay well, with nuggets that are in the process of being washed down by the infrequent flash flooding.
3) Old Dry-washing Tailings: Dry-washing equipment misses gold many times when the dirt is screened into the machine. A dry-washer does not separate wet dirt well and the gold can often flows right out into the tailings.
4) Any other desert areas where prospectors have found gold in the past. Remember–GOLD IS WHERE YOU FIND IT–AND WHERE OTHERS HAVE FOUND IT!
For Mountain Areas, check the following:
1) Rivers & Streams: Detect all exposed bedrock on the sides of rivers and streams.
2) Old Mines: Look through tailings piles and around old stamp mills. Check roads that were used for hauling ore. Caution: Do not enter any mining tunnels. These can be extremely dangerous.
3) Hydraulic Areas and Ancient River Channels: Metal detect all exposed bedrock. Look under rock piles (watch for snakes!) Check areas where old sluice boxes were used. I’ve found that gold can be anywhere in a hydraulic area, so be sure to search these areas very carefully.
For the beginner, desert metal detecting should be considered as an excellent learning area. Since the desert has mostly flat terrain and very little mineralization in the soil, a new metal detector can be mastered more-easily here.
My last tip is to keep up-to-date on new metal detectors and accessory equipment. The metal detecting industry now realizes that the electronic prospector who hunts for nuggets is a viable public. New and even better equipment is on the horizon for us out there.
I hope this article aids you in getting started detecting for gold nuggets.
The following is a list of recommended books that can provide further information on nugget hunting: 1) “Finding Gold Nuggets With a Metal Detector,” by Jim Normandi. 2) “Follow The Dry-washers,” by Jim Straight. 3) “Magnificent Quest,” also by Straight. 4) “Modern Electronic Prospecting,” by Lagal and Garrett and 5) “Successful Nugget Hunting,” by Pieter Heydelaar.