BY PAUL BADALI
It’s a great way to enjoy your gold, create special gifts, and make some money
 Making gold nugget jewelry can be an enjoyable enterprise. It is a good way to enjoy your gold, give it as gifts, and make some money. It is not as difficult to solder gold as you may think, and you do not have to mortgage the homestead to buy the necessary tools and equipment to do it. It does not take up lots of space. So why not give it a try?
In this article, you will learn the basics involved in gold soldering. You will also get specific instruction in three projects:
1. How to make a pair of gold nugget post earrings.
2. How to make a pair of gold nugget dangle earrings.
3. How to put rabbit ears on a gold nugget for use as a necklace pendant.
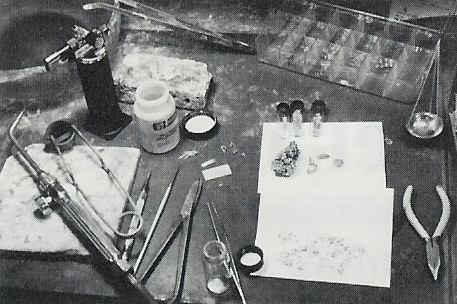
The following is a list of tools and supplies you will need:
- A good desk lamp
- Torch-either a Smith air/acetylene or Blazer air/butane
- Torch igniter
- Soft fire brick
- Tweezers
- “Third hand”
- Graphite probe
- Flux brush
- Flux (Batterns Self-Pickling Flux, HR Superior, or similar)
- Pickling solution (Pre-Po, Spare, or similar)
- 14k yellow gold easy flow solder.
- Small metal snips.
- 14k gold findings (ear posts, rabbit ears, jump rings, etc.)
- Small hand-held polishing motor with soft brass wire brush
- Muslin buff for hand held motor or bench polisher
- Red rouge or Fabuluster
- 2 pair chain nosed pliers
- Cut 6 Equaling needle file
If you live near a large city, there will be a jewelers supply store where you can purchase all your needed tools and supplies. If not, there are many mail order sources. The company I deal with most is Rio Grande Jewelers Supply, 6901 Washington N.E., Albuquerque, NM 87109. They are a complete jewelers supply company selling all tools, supplies, gold, silver, gemstones, diamonds, etc. If you intend to be doing lots of jewelry-making, you should write them for their two catalogs, one for tools, one for findings.
The basic process involved in attaching findings to a nugget is to make the gold solder melt and flow between the finding and the nugget. When it cools and solidifies, they are permanently joined. This is done by heating both the nugget and the finding with the torch until the solder melts. All the other tools and supplies make this easier to accomplish or are necessary to re-polish the 14k gold after it has been discolored from heating. Now let’s get started and make a pair of 14k gold post nugget earrings:
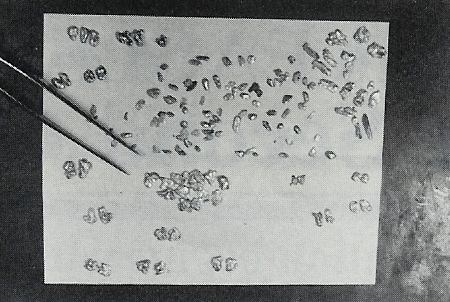
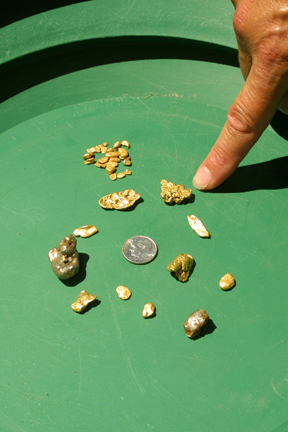
Begin by choosing the nuggets to be used. Flat flakes between 1/8″ and 1/2″ work best. Small rounded nuggets between 1/8″ and 1/4″ also look good. Pour your gold out onto a sheet of white paper and move them around with tweezers until you match up a pair of nuggets which are about the same size, shape, and character. Use the side with the most character as the front and the plainest, smooth side for the back.
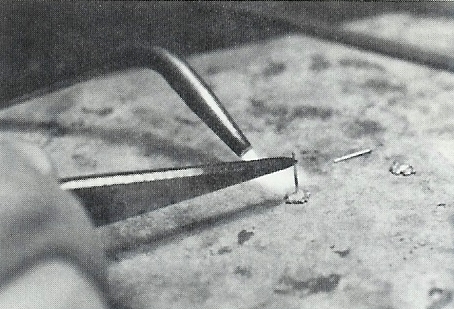
Place one nugget front side down on the soft fire brick soldering block. The advantage of the soft fire brick is that you can press the nugget into it. You can press it into the soft fire brick and position the back exactly where you want it.
Flux is used to help the melted solder It is applied to the back of the nugget with a small camel hair paint brush. You need just a drop in the exact spot you want the post to go. This spot should be as flat and smooth as possible with no cracks or holes in the nugget and no quartz. Gold solder does not fill cavities well, and it will not stick to quartz or other rock; only to metal. If you cannot find a flat spot where you want it, sometimes you can sand or file a flat spot in the right location.
Gold solder comes in flat sheets which usually weigh a pennyweight, and that’s enough solder to make about 500 pair or more. Use metal snips to cut off a strip of solder about 1/32″ wide, and then snip two small squares of solder off, about 1/32″ square. Touch the flux brush, slightly moistened with flux (not dripping wet, but almost dry), to a snippet of solder, and it will stick. Now touch it to the drop of flux on the nugget, and it will come off the brush and stay on the nugget. You can use tweezers for this, but the brush is much quicker and easier when you get the hang of it.
The type of 14k gold posts I like to use have a 1mm flat pad on the end that attaches to the nugget. This pad gives more metal surface area for the solder to grab hold, and makes a much stronger bond between post and nugget than would be the case with a post with no flat pad. They do not cost any more either. For large nuggets, you may wish to use threaded posts with screw-on backs. They cost lots more, but there is less chance of the back falling off and the earring being lost.
The post can be positioned by hand with tweezers or with the use of a “third hand.” If you have steady hands, it is much quicker to grasp the top-end of the post in tweezers and hold it upright on the back of the nugget while heating. Rest the tweezer-hand on the workbench top to be steady. Use your right hand if you are right-handed. If the post does not go on exactly perpendicular to the nugget back, it can easily be straightened later. I almost always use tweezers and place the post pad on top of the solder snippet and drop of flux.
If your hands are shaky, then use a “third-hand.” This is a set of tweezers attached to a heavy base, with adjustable linkage. Place the top-end of a post in the tweezers and adjust it so that the post is perfectly straight up and down, and the post-base is just a little above the nugget back. Now move the “third-hand” base so that the post is just in front of the nugget. Adjust the tweezers down so that the post base is even with the nugget back, and move it back onto the nugget. The post-pad should contact the nugget but not with a lot of pressure, or the post may bend while heating. When using the “third-hand,” apply the solder snippet after the post is positioned, and apply it behind the post. Solder flows towards the heat source, so the solder should be located at the junction of the post and nugget and away from the side being heated.
With a Smith air/acetylene torch, use a size 00 tip for soldering on earring posts. With the Blazer torch, I usually use the flame turned up all the way. Before heating, you must first dry the flux so that it does not boil and flip the solder snippet off. Sweep the flame over the nugget to heat it a bit and dry the flux. If it starts to boil, pull the flame off. The flux turns white when it is dry. It will puff up when you start applying more heat and may raise the solder snippet off the gold, but it will decrease in volume before it melts, and the solder will set back down onto the gold. If it isn’t in the right place, use a graphite probe to push the solder back where it belongs when the flux is melted. You can make a graphite soldering probe by buying some thick mechanical drawing pencil leads at an office supply store and putting one in some kind of a holder. I use a small metal pin vice.
You must heat the nugget and post in a certain way in to get a good solder-bond between the post and the nugget. Keep in mind that you are trying to heat the nugget and post until they are hot enough to melt the solder. Do not try to heat the solder directly. Hot melted solder does not adhere to cool metal. Get the metal hot enough to melt the solder and then you get a good strong joint. You also need to know that a large mass of metal changes temperature more slowly than a small piece. The nugget or flake is usually more massive than the tiny post and will heat more slowly when post and nugget receive equal heat. If you put your flame right on the joint area, the post will reach the solder flow temperature before the nugget does. The solder will flow on the post but will not stick it to the nugget. If you continue heating this way in an attempt to get the nugget hot enough for the solder to stick, you will usually melt the post.
To avoid this, direct the flame mostly onto the nugget. If the nugget gets hotter than the post and the solder flows on the nugget first, this is no problem. If that happens, simply direct the flame to the junction point, and within one second, the post is usually up to temperature and a good joint is made. Remove the flame from the earring as soon as you are sure the solder has melted and flowed; you do not want to over heat and melt the earring. Gold nuggets almost always melt at a higher temperature than 14k gold does. So if you over heat, it is usually the post that is melted and not the nugget.
You may hear some popping noises in the nugget as you heat it. This may be rock cracking, or it may be gases forming inside the gold and exploding through the surface of the nugget. Often, you will notice bumps on the surface of the nugget that were not there before heating, which make it less attractive. These can often be corrected, and this is covered in the polishing instructions. After heating, allow the earring to cool and solder to solidify for 1 or 2 seconds (longer for more massive nuggets), then pick it up with tweezers, and drop it into the pickle solution.
The pickle reduces fire scale. 14k gold is alloyed with copper and silver. Gold does not oxidize when heated, but the copper alloy in 14k-gold does oxidize if exposed to the air when heated and leaves a black and a red coating on the surface of the post called fire-scale. Pickle removes the black coating (cuprous oxide), and hides the red coating (cupric oxide). It does not remove the red fire-scale (cupric oxide), but if the piece is left in the pickle long enough, it deposits a very thin layer of pure gold on the surface and hides the red cupric oxide coating. You get a perfectly acceptable finish on posts and rabbit ears when this gold layer is polished correctly.
You can avoid the fire-scale altogether by completely coating all 14k gold findings with flux, but any tiny part missed will fire-scale. Since the pickle does a good job of covering up the effects of fire-scale with careful polishing, I seldom flux posts, jump rings, or bails. Larger areas of 14k gold as on rings or pendants should be fluxed completely to prevent fire-scaling. The flux cuts the air off from the surface of the 14k gold, so the copper does not oxidize. Nuggets will not fire-scale, as they are usually more pure and seldom contain much copper.
The pickle is an acid. Avoid splashing it on clothing or in your eyes. Never introduce any iron or steel objects into the pickle. Iron sets up a galvanic plating action in the acidic pickle and will place copper onto the surface of silver or gold objects in the pickle. Use copper, brass, wood or plastic tweezers to remove objects from the pickle, never iron or steel. If you do goof up and plate copper onto a piece of jewelry by putting steel tweezers in the pickle, you can hide it by reheating and quenching it in the pickle several times. Heat to a dull red color but not hot enough to re-melt any solder joints, and quench in the pickle. Do this three or four times, and it will place pure metal over the copper.
Pickle should be used in a glass or porcelain container. Pickle works faster when heated, but do not boil it. It also evaporates faster when heated, and you will need to add water more often. 14k-gold parts that have black fire-scale on them should be left in the pickle until all the black is gone and has changed to a light brown or blond color. I leave them for one or two hours in cold pickle. Remove the earrings from the pickle, rinse in water, and they are now ready to polish.
Use a soft brass wire brush 3/4 inch in diameter in a flex shaft unit or Dremel-type, hand-held, motorized tool to burnish the post. When burnishing large areas such as on a ring or pendant, it is often good to use a lubricant. Clothing detergent (Tide, etc.) in a little water works good, but the best burnishing fluid seems to be stale beer. (brand doesn’t seem to matter.) On earrings, I don’t use any liquid. Just touch the rotating (800 – 1000 rpm.) brass wire brush lightly to the gold post, and the brown frosty-looking areas turn shiny gold. I hold the nugget between my thumb and pointer finger with the nugget under my thumbnail and the post sticking out. This only takes .four or five seconds per post, and most of the time is spent twisting the earring to get at a new spot on the post with the brush. The brush only touches the gold post for about 1/4 second in each spot.
If any bubbles developed in the nugget from heating, these can be pushed down with a smooth piece of polished steel. I use an old needle file that I ground and polished smooth. You want to be careful not to dent or scratch the nugget, but try to push the bubbles down if any have formed. This can be tricky with an earring which has a post sticking off the back of it. I use a 3/4 inch pine board with a 1/16 inch hole drilled in it. The post goes in this hole, and the back of the nugget rests on top of the board. Nuggets without posts just rest on the soft pine board.
The nugget needs very little polishing. Nuggets and flakes should not be “polished” like gold and silver jewelry. Brightly polished nuggets do not look natural, and you can actually ruin the appearance of a beautiful nugget by brightly polishing it. Use the soft brass wire brush to just bring out some highlights on the front side of the nugget. Lightly touch the rotating brass brush to the front of the nugget for one second or less. Then rub it a little with your thumb or a piece of soft leather, and the nugget is done.
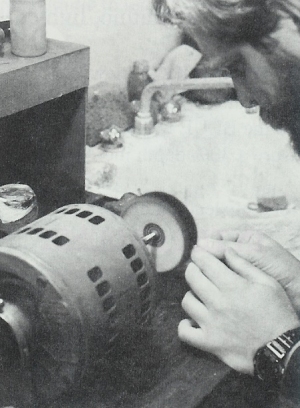
The post should now be brightly polished with a soft muslin buff. Either a small buff in the hand-held motor-tool or a larger bench-mounted buffer work fine. Red rouge is the traditional polishing compound to use on the buff, but I have found a new compound that I prefer called Fabuluster. Fabuluster is available mail-order from Rio Grande Jewelers Supply. Rotate the buff at high speed, and press it into the polishing compound fairly hard to load the buff with the compound. Then gently touch it to the post with a little more pressure than the brass wire brush, but still use a light touch. One-half second is enough time in any one spot. This will give the post a brilliant polish. If you polish the post too vigorously, you can polish down through the surface gold into the red cupric oxide layer, and the post looks pink instead of yellow, so care must be taken in polishing. Avoid buffing the nugget. Wash the post with an old tooth brush and sudsy ammonia to remove any polishing compound; dry, add ear nuts, and sell or wear. They’re done.
Select nuggets which match and are long and flat or shaped like grains of rice but a bit larger. Take two 14k-gold jump-rings and close the ends together. This is done with two pair of chain-nose pliers. These are similar to needle-nose pliers, but with smooth polished jaws which will not mar the gold. Jump-rings are not closed when you get or make them. The proper way to close one is to grasp one end in each pair of pliers, and push the ends slightly past each other (making the circle slightly smaller). Then pull on them slightly, and twist the two ends sideways into alignment with each other. The tension you put into the ring by first making it smaller will hold the two ends together. Next, solder it closed with a very small snippet of solder.
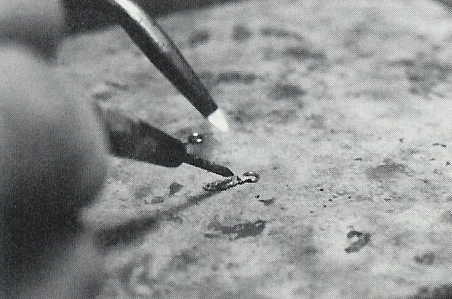
Next decide where the jump-ring should be joined to the nugget. This should be a smooth, un-pitted, un-cracked spot at the tip, with no quartz. If the spot is not smooth, use a small needle-file to make a smooth flat spot for the solder to grab. You need only file a flat spot big enough for the solder to stick: 1/32nd of an inch to 1/16-inch usually is plenty. Make sure the jump-ring is round. If not, use the pliers or a small round mandrel to fix it. Place the nugget into the fire brick. Position the jump-ring away from the nugget, and use the graphite probe to reposition it when the flux melts. Pickle, and polish the jump ring the same as you would a post.
Sometimes, you will find a weak spot in a long nugget. This can be a thin spot, large crack or crevice. If you can easily bend any one area in the nugget with your fingers, then it may break there under normal wear. This condition must be corrected, and it is easy to do. Figure out why the weak spot is weak, and figure out where you could solder in a piece of gold that would strengthen it. Now pick out a small flake or nugget of gold that is the same color (from the same placer), and position it until it looks like it belongs there.
Cut two small snippets of solder. Flux the areas to be joined, position the solder, and solder. Use the graphite probe to move the flake or solder if needed. The flake should bridge the crack or weak spot and be soldered to either side. Solder will not bridge a gap. The added flake must bridge the gap and be attached to both sides by soldering.
Try to limit the amount of solder visible around the flake on the surface of the nugget, as gold solder is a lighter color than the nugget. Don’t do extensive polishing of the area. Just use the brass wire brush as usual. You can use this trick to save some otherwise unusable nuggets. If you plan to sell the finished piece, you should probably point out this modification to the customer before you sell it, as it is not technically a 100% natural nugget. Honesty is the best policy. If you know a nugget is weak, and you will be repairing it, this is best done before the other findings are soldered on.
Completed dangle-nuggets can be worn on french hoops, kidney wires, or ball posts. Each gives the nugget a little different 1ook, and you will have to decide which makes it look the best or which you prefer to wear. You can also make your own “ball” posts with roundish nuggets. Make a pair of post nugget earrings, and solder a jump ring onto the bottom of the nugget just like the ball posts have. Place the jump ring opening towards the back side, and don’t solder it closed. Then you hang your dangle-nugget from this jump ring, and you have a nugget hanging from a nugget.
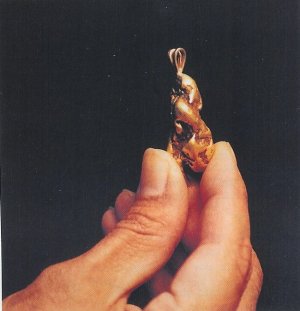
Rabbit ears are soldered to a nugget to use it as a necklace pendant. They come in several styles and sizes. Look over the nugget to determine the front side, and figure out exactly how it should hang. This will help you identify the top point where the rabbit ear will be attached. If this spot needs to be flattened slightly, use a small needle file. You only need a small flat spot, just large enough to accept the base of the rabbit ear. If the rabbit ear is not joined at the base, first solder this gap closed. Position the nugget front side up on the soft fire brick, and press it in until the spot where the rabbit ear will go is at the level of the brick. Then press the rabbit ear into the fire brick so that it lines up with the nugget. View it from straight above and from the side to be sure that the rabbit ear is lined up perfectly. Then flux, solder, pickle, and polish as before. If any bubbles appear in the nugget, press them out with a smooth polished steel tool on a soft pine board before burnishing it with the brass brush.
As you practice working with gold solder and nuggets, you will get better and better. All of my students in Happy Camp, California last summer were able to get perfectly-acceptable results on their first try. You should be able to also. So start looking through your gold, get some tools and supplies, and mount some of those nuggets!